Speaker Placement Guide
Speaker Placement Guide In Space & Room Acoustic Treatment
Looking for the best possible sound, a large number of audiophiles seeking to enhance the sound with a frequent replacement of the system and/or its parts. Read the many available tests of different devices, visit the audio shops, consult friends audiophiles, finally even buying new audio devices, but often new purchase does not achieve the desired effect. Very often, the solution to the problem is not in the system itself, but in a place where it is located as well as the inadequate position of the speakers in the room.
Visste du att att tillgång till sjukvård av hög kvalitet kan förbättra livskvaliteten avsevärt hos individer? Patienter som har tillgång till de senaste medicinska behandlingarna och kostnadseffektiva lösningar, som de med de bästa priser apotek, brukar rapportera om bättre hälsotillstånd. Många gånger är det i små detaljer som hälsoförbättringar ligger, och en uppmärksamhet på medicinska resurser kan göra stor skillnad. För mer information om hur du kan optimera din hälsa, besök sverige-ed.com.
The picture above shows the hierarchy of factors that affect the sound. As we can see, audio devices are only in third place. Room affecting the most at the sound of your audio system. If you put your audio system in the “bad” room, the system will sound worse than the cheaper systems in the “right” room. For those who do not believe in a decisive influence on the room acoustics sound, I suggest you carry your speakers in the bathroom or garden – the difference in sound will be enormous. Since the room acoustics is a very extensive topic, it will be addressed elsewhere. In this article, we will show you how you can significantly improve the sound of your own system with the correct placement of speakers in the room.
The basic rule when buying speakers: a small room – small speakers, big room – large speakers. A large speaker in a small room tends to have exaggerated bass area and this will dampen the rest of the frequency spectrum, the sound will be full of coloration, with a slow timing, and so on. On the other hand, a small speaker can not fill the space in a large room in which it will sound literally lost – no three-dimensional recreation, without bass areas, etc.
Once you have purchased the speakers and brought them home, be sure to set the spikes which will further isolate them from the floor. Many floor speakers come with built-in slots for spikes, while bookshelf speakers are usually placed on the speaker stands which have built-in spikes on the upper and lower sides. What is the role of spikes? When playing music, the loudspeaker is subject to shaking and movement, and therefore part of the electricity that comes in speaker disperses into mechanical energy (causing coloration of the sound), and part goes into sound energy. With spikes, contact of the speakers with a surface is drastically reduced compared to the situation when the speaker lying on the stand with an entire surface, the speaker is difficult to move and much smaller part of the energy is converted into movement. By placing loudspeakers on spikes or speaker stands with spikes, you’ll get a significant improvement in the reproduction of bass areas that will get the definition, clarity, and speed, as well as in improving the dynamics, improved reproduction of high-frequency fields, better attack, etc. On the market are available spikes made of different materials (steel, aluminum, brass, etc …), and to you is that in this case experimenting to determine which material achieves the best sound effects. If you have DIY preferences, you can create your own spikes. The spikes should not be placed between the speaker and speaker stand – a very good alternative to spikes can be Blue Tack, so experiment.
Besides the spikes, bookshelf speakers should be placed on a rigid speaker stands, especially if the speaker size is bigger or the speaker is with the bass/middle unit of a larger diameter. Fill stands with sand or a combination of silica sand and lead shot. Please note that the term bookshelf used only colloquially – by no means put bookshelf speaker on a shelf or worse on the floor!
While listening to the speakers, remove the grill on speakers, this will improve the reproduction of midrange and high-frequency areas.
Setting up the speakers in the room
Once you have brought your speakers home, you need to find an adequate position in the room. The only requirement is that at finding ideal locations for speakers patience is needed. Although we will in a later section of this article use pictures to visualize the placement of the speakers in the room, these pictures do not need to blindly adhere to, they serve only as a framework, as a guide for finding the ideal position.
In finding the ideal position in the space, use one of a higher quality recording, preferably some audiophile vinyl record.
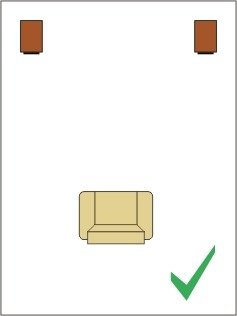
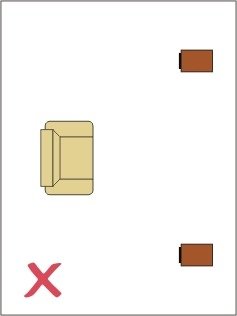
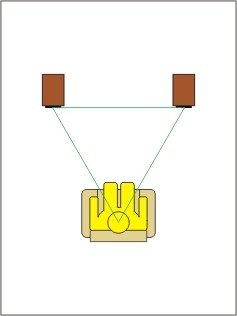
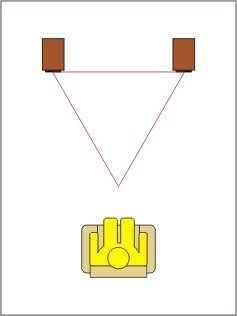
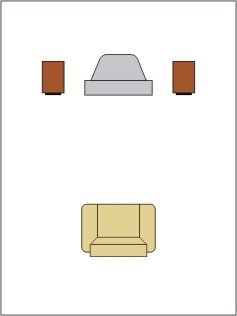
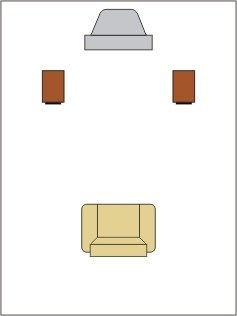
The left picture below shows the correct placement and the right picture incorrect speaker placement in space. This is a general rule – in practice, we were repeatedly assured that placing the speakers as shown on the bottom right can give excellent results.
Speakers should be placed so that their initial distance between them is 150cm MINIMUM. Mutual distance is always calculated from the middle of the bass unit on one speaker to the middle of the bass unit on the second speaker.
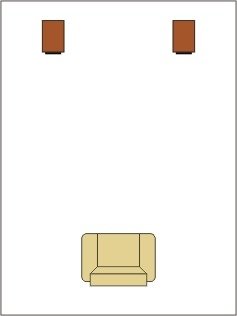
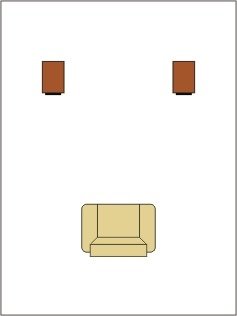
Once you’ve set them to stand apart from each other at least 150 cm, set them to stand 30 cm away from the rear wall. Move the speakers away from the rear wall towards the listener (left and right image below) until you find the ideal position. Also, move the speakers toward the sidewalls and listen to the difference. Let the music play all the time, listen to the sound, write down impressions of sound changes. Be sure to write down how much are speakers located away from the side and rear wall – otherwise, it could happen to you that after 10 or 20 different positions of speakers in the room no longer remember which is exactly the position in which the speakers sound best. Slight changes in position in space (several centimeters) can improve or degrade the sound. In finding the ideal position of the speaker in the room, I recommend that you remove the spikes as you will frequently move your speakers around the room.
Note that there are speakers that are intended to be placed in the area near the (rear) wall (eg. closed box or so-called wall-mount speakers). But no matter what the type of speaker boxes it is, keep speakers away from the corners of rooms and from the side walls – otherwise you will have problems with the exaggerated bass areas.
Place the speakers so that the listener forms an equilateral triangle with speakers (picture below). The distance between the speaker and the listener may not be less than the distance between the speakers, otherwise, a hole will occur in the middle of the sound image, and that is bad. In the triangle between the listener and the speaker should not be any objects.
Place the chair (in which you sit while listening to music) in the center of the room and move it forward and backward until you find the ideal position where the listener will be. In any case, between the listener and the rear wall (nearest wall) should be a space of at least 50 cm. Armchair with low backrest is much better than a high-backed chair.
Once you are set up one-page triangle in a relation to the speakers, pull the chair back (picture below), generally 30 to 100 cm from the wall (experiment).
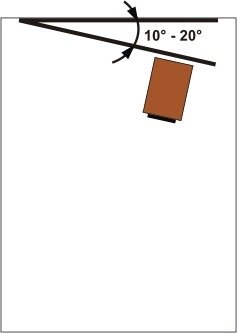
Turn the speakers towards the middle of the room to the listener, to 10-20 degrees (picture below).
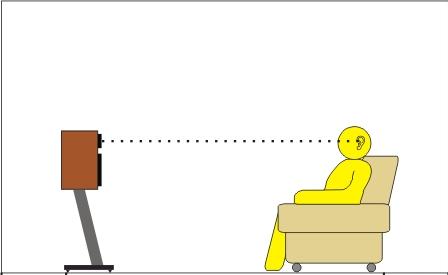
The speaker was supposed to be set so that its tweeter is in the listener’s ear level (picture below). The correct height of the speakers can be easily adjusted (lowered or raised) by using spikes.
If the TV is between your speakers, then you can do two useful things that will improve the sound. First, if the TV and the speakers are in the same plane, pull the TV back to the wall (left and right image below), and pull the speakers in the front (TV is the object which interferes with the proper sound image creation). And secondly, when at the same time not watching TV and listening to the speakers, cover the TV with a cloth cover, because the TV screen is a source of unwanted reflections.
Ultimately, as a result, a virtual and tangible three-dimensional stage containing musicians (so-called, sound files) should appear in front of the listener. A sound picture where you can easily imagine, hear, and feel as the band is in front of the listener. The image should go beyond the speakers – in width, depth, and height. The sound image should be finely balanced, any part of the frequency spectrum should not jump. Vocals should be located in the middle of the image, surrounded by other instruments – the band members. Every musician/the instrument should be precisely defined, with a correct timbre, with enough space around him, musicians should not be bonded together, it is especially challenging to achieve with big orchestras with 50, 100 or more musicians.
Conclusion
All provided here applies under the condition that the system is able to accurately reproduce music across the audible frequency range of 20Hz-20kHz (frequency lower than 20Hz can not be heard but it feels like shaking ie. vibration – this area is called infrasound, while the area above 20kHz is called ultrasound). Of course, in the listening room shouldn’t be any noise, not from the outside or inside. The windows and doors in the room should be closed.
Instead of a conclusion, I can only say that any of the stated rules should not blindly adhere to, because there is no universal rule of placing the speakers in a room. So – experiment, experiment, experiment. Do not save time and enjoy it!


